 If your child likes to play with dolls, you will certainly have a desire to give him something important for his dolls, something made by himself. Each doll needs outfits, and the game will become even more interesting if the toy has its own house and pieces of furniture in it. It is not necessary to purchase furniture; you can build it yourself. In order for the child to be interested, bring him to this lesson. Consider how to make a chair for dolls from improvised materials.
Chair for dolls - what you need
You can build a chair from various materials. It can be a design from a plastic bottle, cardboard, foam rubber, matchboxes or a chair, knitted from threads. Depending on the materials available in the house and your skills, you can choose one of them.
We will consider the option of manufacturing a doll's chair from the following materials:
- Cardboard box.
- Foam rubber, an ordinary sponge for washing dishes is suitable.
- Beautiful fabric for decoration.
- PVA glue.
As you can see, for work you will need very primitive materials that are not difficult to collect. This chair will come out very budget, and a lot of joy will cause the child.

Step-by-step instructions on how to make a doll chair
When you have prepared the necessary materials, you can proceed directly to the manufacture of doll furniture.
To begin with, it will be necessary to determine the size of the future chair. To do this, measure your doll, for which, in fact, create furniture. If this is a miniature Barbie, it will be enough to cut a cardboard with dimensions of 21x12. For a larger doll, respectively, and the size of the cardboard will need to choose more.
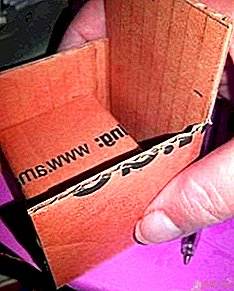
- Having marked the required size, cut cardboard on it.
- In the right and left edges, it is necessary to cut off the square, forming the forum of the future chair.
- From the squares that you cut off in the first paragraph, you need to form a seat. Glue the lower part from the inside. You can use double-sided tape instead of PVA glue, it is very convenient and simple. Do not attach the saddle to the main body, it is too early.
- Foam must be glued to the seat and back. Do not make them too soft, it is better to cut the sponge in half.
- Expand your blank. The armrests also wrap with foam. Can be fixed with glue or thread with a needle.
- Wrap the back of the product and the visible part with a prepared beautiful fabric. Glue the material to the base.
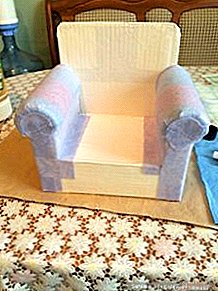
- Replace the bottom of the product. Measure the necessary size of an upholstery.
- Paste past the future chair.
- Expand the top of the workpiece and finish wrapping all visible areas with a cloth.
- On the back you can not really try to achieve the perfect result, in the end the existing flaws can be masked.
- Assemble the part by putting all the elements in place. Glue the missing items.


REFERENCE. Instead of glue PVA you can use the transparent glue Moment. It quickly sets and details, fabric and decorating elements will be securely attached. The whole process will go much sooner.
As a result of simple actions and using very simple materials, you can create a really beautiful doll chair. If you add a little satin or velvet, your doll item will turn out even more beautiful. Your child will definitely be delighted with such a surprise.
REFERENCE. Take cardboard that is not too thick for making doll furniture, otherwise it will be difficult to bend, because the parts, in fact, are very small, working with them is not so simple.

Leave Your Comment